License Portal
Setting Up Enterprise Single Sign-On (SSO) via OIDC
This article is intended for workspace Admins who want to configure how their users sign in to AQT One and the AQT License Portal. If you are looking for information on how users are created and licensed automatically once SSO is in place, see this article.
AQT One supports two levels of sign-in configuration:
Personal sign-in methods: users sign in using a magic link, email and password, or with their personal Google or Microsoft account. Admins can control which of these methods are available in the workspace via the Workspace Settings page.
Enterprise SSO (OIDC): users are routed to your organisation's identity provider (Microsoft Entra ID, Okta, Google Workspace, Auth0, and others) when they sign in. This is the recommended setup for larger organisations, and is required if you want automatic user provisioning.
This guide covers Enterprise SSO (OIDC).
Prerequisites
Before you begin, make sure that:
You are an Owner or Admin of your AQT workspace. You'll know you are if you can access the Workspace Settings.
You (or your IT team) can edit DNS records for your email domain.
You have admin access to your identity provider.
Step 1: Verify your domain
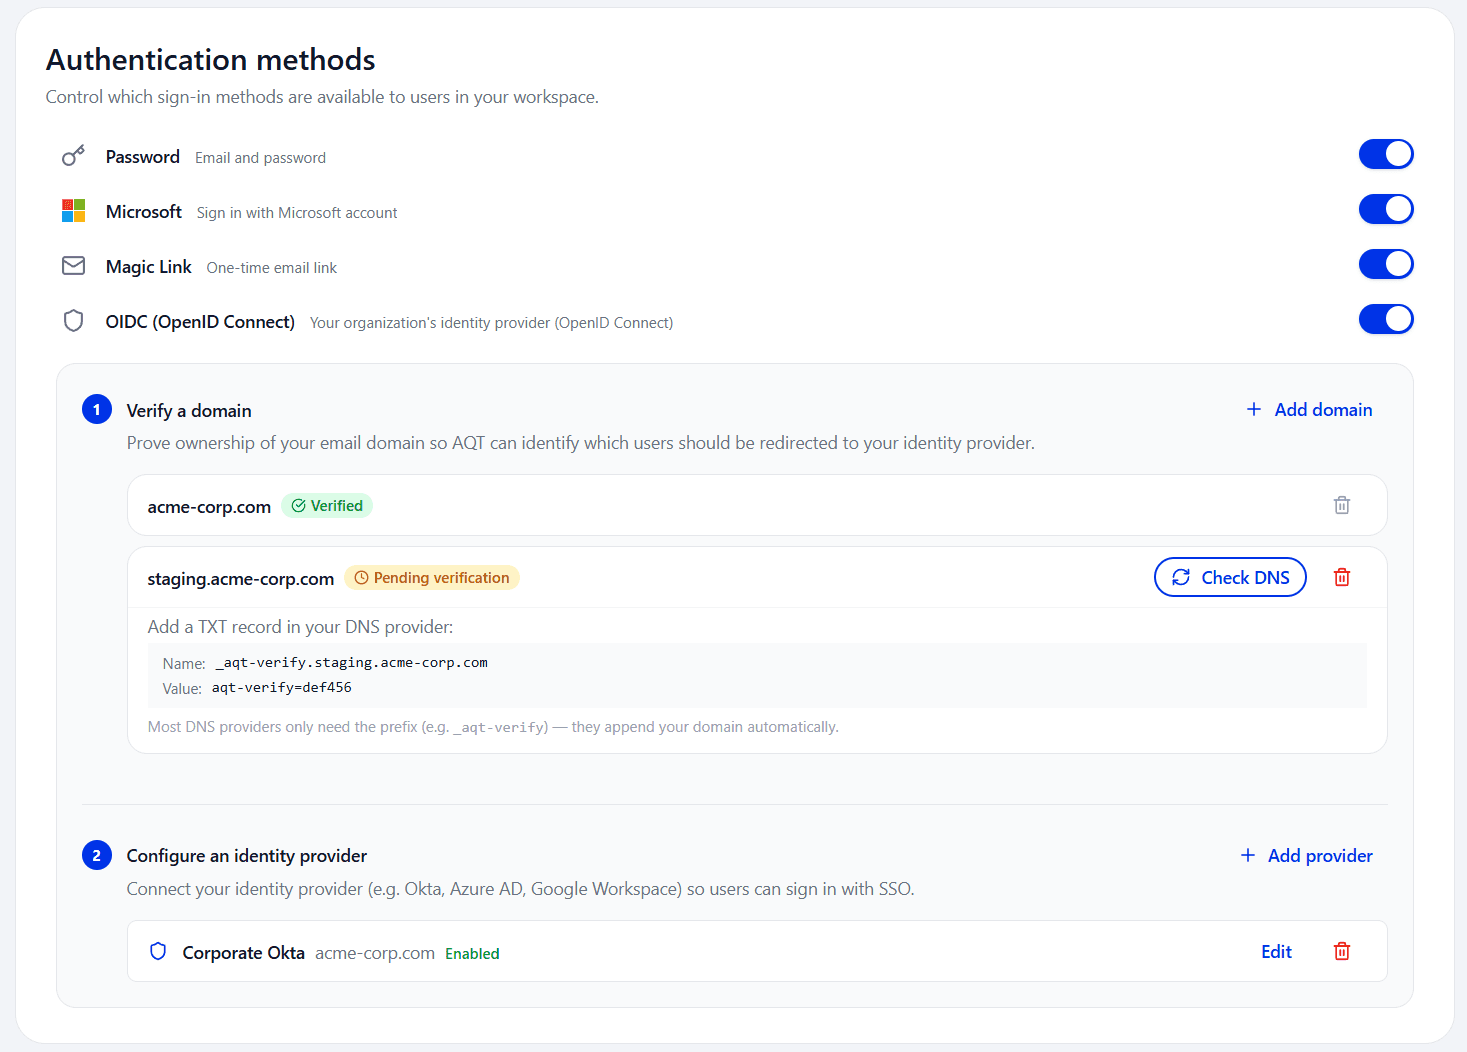
In the License Portal, go to Workspace settings.
Switch on OIDC (OpenID Connect) under Authentication methods.
Under Verify a domain, click + Add Domain, enter your email domain (for example, yourdomain.com), and click Add.
Add the displayed TXT record (on
_aqt-verify.yourdomain.com) at your DNS provider. Propagation usually takes 5 to 15 minutes.Click Check DNS until the badge reads Verified.
Step 2: Connect your identity provider
In your identity provider, create an OIDC/OAuth 2.0 web application (in Entra ID, an app registration) using the Authorization Code grant and the scopes
openid,profile, andemail.Add both redirect URIs to the application (in Entra ID, under the Web platform):
Portal callback:
https://license.querytool.com/api/auth/oidc/callbackDesktop activation callback:
https://activation.querytool.com/api/auth/oidc/callback
Important: the desktop activation callback is the most commonly missed step, and client sign-in will break if it is not added. Users will be able to sign in to the License Portal but not activate the AQT desktop application.
Note the Client ID, Client Secret, and Authority (Issuer) URL.
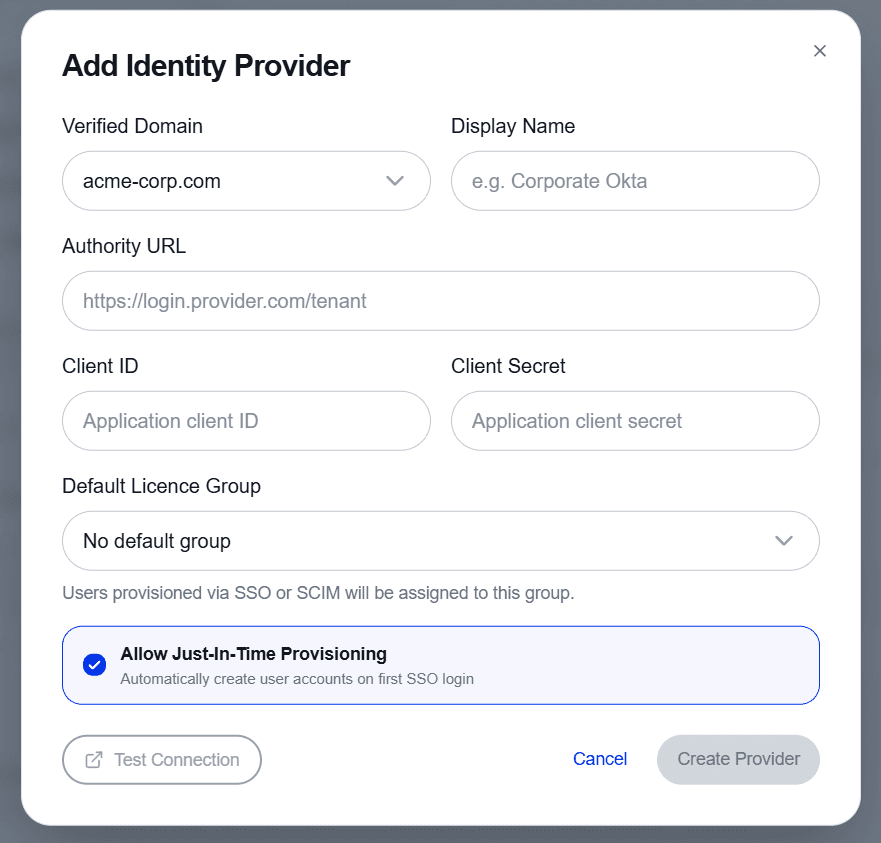
Back in the License Portal under Authentication Methods, open Configure an identity provider, click Add Provider, and fill in:
Verified Domain: the domain you verified in Step 1.
Identity provider type: the kind of IdP, with an optional display name.
Authority URL, Client ID, and Client Secret: from your IdP.
Default License Group: the license group newly provisioned users will draw their seat from.
Allow Just-In-Time Provisioning: leave on to auto-create accounts on first login, or turn off if you provision exclusively via SCIM.
Click Test Connection, then Create Provider.
How sign-in works once SSO is enabled
On the login page, a user enters their email address. AQT reads the domain and, if it matches a verified domain with SSO enabled, sends them to your identity provider to authenticate. Users on different verified domains can be routed to different identity providers, even within the same workspace.
Troubleshooting
The domain badge stays on "Pending verification". The TXT record must be on _aqt-verify.yourdomain.com, not the root of the domain. Paste only the token value into the record, with no surrounding quotes or extra spaces. Confirm the record is visible with a public checker such as dnschecker.org before clicking Check DNS again. DNS can take up to 48 hours to propagate in some environments, so if the record is live everywhere and AQT still will not verify, wait and retry.
"Domain already in use". Each domain can be linked to only one workspace. If it is verified in another workspace (for example, an earlier trial), remove it there first.
Users do not see an SSO option on the login page. Check that the domain shows as Verified, that an identity provider is configured for it, and that you clicked Save Authentication Settings. Also confirm the user's email domain exactly matches the verified domain: a user at acme.com is not routed by a domain verified as uk.acme.com.
Test Connection fails. Due to differences in how identity providers work, it is not possible to test connections for all providers. It is therefore possible the connection is working, and the failure is a false negative. That said, the Authority (Issuer) URL is usually the problem. For Entra ID it must end in /v2.0. The discovery endpoint (the Authority URL followed by /.well-known/openid-configuration) must be reachable publicly. Remove any trailing slash.
Sign-in redirects to the IdP but then fails. The redirect URI in your IdP must match https://license.querytool.com/api/auth/oidc/callback character for character: https (not http), no trailing slash, exact case. Confirm the openid, profile, and email scopes are granted and the Client ID and Client Secret are correct.
Users can sign in to the License Portal, but activating the AQT desktop application fails. The desktop activation callback https://activation.querytool.com/api/auth/oidc/callback is missing from your IdP application's redirect URIs. Add it alongside the portal callback and try again.