License Portal
Setting Up Single Sign-On and Provisioning with Microsoft Entra ID
Connect Microsoft Entra ID to the AQT License Portal for single sign-on and SCIM provisioning.
This article is intended for workspace Admins who are setting up single sign-on and SCIM provisioning for their organization. If you are looking to activate AQT on your own computer, please see Activating or Deactivating AQT instead.
This guide connects your Entra tenant to the AQT License Portal. Once it is complete, your users will sign in to the portal and to AQT One with their Entra account, and their license and role will be determined by their Entra group membership.
The setup involves creating two objects in Azure. The first is an app registration, which handles sign-in. The second is an enterprise application, created as a non-gallery application, which handles provisioning: creating, updating and deactivating accounts, and pushing groups so that they can be mapped to licenses.
Steps 1 to 3 cover sign-in. Steps 4 onwards cover provisioning and are only needed if you want it.
Note: When you create the app registration in step 2, Azure automatically creates an enterprise application with the same name alongside it. This automatic one cannot be used for provisioning, and its Provisioning tab will always be grayed out. The enterprise application you provision from is the one you create by hand in step 4, so your Enterprise apps list will show two entries, and only the hand-made one is able to provision.
Before You Begin
To follow this guide, you will need:
In Azure, permission to create app registrations and enterprise applications, which means the Application Administrator or Cloud Application Administrator role.
A workspace in the License Portal where you are an Admin, with SSO enabled. If OIDC (OpenID Connect) is not listed under Settings > Authentication methods, please contact support.
A domain you can prove you own. Domain verification is step 1 and is not optional, because no sign-in or provisioning is matched to your workspace until a domain has been verified.
Available license seats. Provisioning does not purchase seats, so if there is no free seat, a user is still provisioned but will wait until one becomes available.
Entra ID P1 or P2, if you want to assign groups to an enterprise application. Step 7 explains what to do on the free tier.
Everything on the AQT side of the setup is found under Settings > Authentication methods > OIDC (OpenID Connect).
Step 1: Verify Your Email Domain
In the portal, go to OIDC > 1. Verify a domain > Add domain and enter a domain that your users’ email addresses end in. The domain will be listed as Pending verification, along with the DNS record you need to publish:
Name:
_aqt-verify.<your-domain>Value: the token shown against that domain
Add this as a TXT record with your DNS provider. Most DNS providers only want the prefix, _aqt-verify, and will append the domain themselves.
Once the record has propagated, click Check DNS against the domain. The badge will change to Verified when it passes.
You can verify several domains and attach them all to the same identity provider. Make sure you verify the domains your accounts actually use, because a user whose email address falls outside a verified domain will not be matched to your workspace.
Please note that a verified domain cannot be removed while an identity provider is attached to it.
Step 2: Create the App Registration (Azure)
Go to App registrations > New registration and create a registration with the supported account types set to Single tenant only.
The registration needs both of the following redirect URIs, with the platform type set to Web:
Portal sign-in:
https://license.querytool.com/api/auth/oidc/callbackAQT One activation:
https://activation.querytool.com/api/auth/oidc/callback
You can add them during registration, or afterwards from the registration’s Authentication page, which is where both will appear once saved:

Note: Be sure to add both URIs. The desktop client authenticates against the activation server rather than the portal, so the second URI is what allows users to sign in from AQT One itself.
Both URIs are also shown in the portal under 2. Configure an identity provider > Redirect URIs, where you can copy them.
Back in Azure, collect three values:
The Application (client) ID and Directory (tenant) ID, from the registration’s Overview page.
A client secret, from Certificates & secrets > New client secret. Copy the Value column, not the Secret ID, as the value is only shown once.
Step 3: Add the Identity Provider (Portal)
Go to OIDC > 2. Configure an identity provider > Add provider and fill in the following:
Verified domain: the verified domain, or domains, that this provider should cover.
Display name: the name that should appear on the sign-in button, such as
Corporate Entra.Authority URL:
https://login.microsoftonline.com/<tenant-id>/v2.0Client ID: the Application (client) ID from step 2.
Client Secret: the secret Value from step 2.
Fallback license group: set this to None if you are using SCIM.
Allow Just-In-Time Provisioning: turn this off if you are using SCIM.
Click Test connection, and once the test passes, create the provider.
Note: The
/v2.0suffix is required. AQT fetches<authority>/.well-known/openid-configurationand compares theissuervalue inside it against what you entered. Without/v2.0, it will fail with “Identity provider issuer mismatch”, and the error message shows both strings so that you can compare them. A trailing slash is fine, as it is trimmed before the comparison.
You will notice there is no redirect URI field. AQT derives its callback URLs from its own base URLs, which is why the URIs registered in step 2 must match exactly.
Using SSO for sign-in only, without SCIM? Turn Allow Just-In-Time Provisioning on and set Fallback license group to the license that new users should receive. If JIT is off and SCIM is not configured, anyone without an existing account will be refused at sign-in and told to ask an administrator for an invitation. Only leave JIT off if you intend to invite every user by hand; in that case, their account is linked to their directory identity the first time they sign in with SSO.
Sign-in is now set up. The remaining steps add provisioning.
Step 4: Create the Enterprise Application (Azure)
Go to Enterprise apps > New application > Create your own application and select the third option, Integrate any other application you don’t find in the gallery (Non-gallery).
The other two options create an app registration or an Application Proxy app, and neither of those can provision. Give the new application a name that is distinct from the app registration, such as AQT SCIM, so that the two are never confused.
Step 5: Generate a SCIM Token (Portal)
Go to Settings > SCIM Provisioning > Generate Token, select the identity provider you created in step 3, and give the token a name.
Note: The token is shown once and cannot be retrieved afterwards. To rotate it, generate the replacement before revoking the old one, as both can be live at the same time.
The same panel shows the SCIM endpoint:
https://license.querytool.com/scim/v2
The SCIM section only appears once an OIDC identity provider has been enabled in step 3.
Step 6: Configure Provisioning (Azure)
In the enterprise application you created in step 4, go to Provisioning and start a new configuration with the following settings:
Authentication method: Bearer authentication
Tenant URL:
https://license.querytool.com/scim/v2Secret token: the token from step 5
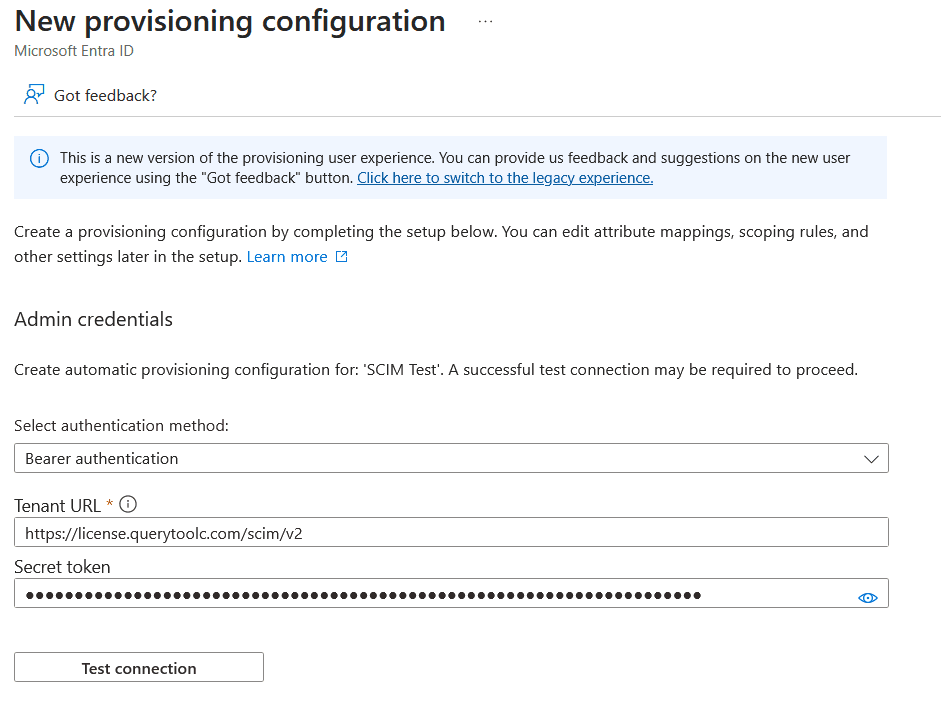
Click Test connection, and once the test passes, save the configuration.
Note: If Get started or the Provisioning tab is grayed out, you are on the enterprise application that step 2 created rather than the one from step 4. The same cause produces the message “Out of the box automatic provisioning to X is not supported today”, where X is the app registration’s name.
Under Mappings, confirm that the group mapping (Synchronize Microsoft Entra ID Groups to your app) is enabled. This is what sends the group objects that group mapping depends on.
Set a Notification Email. If provisioning is ever quarantined, Entra announces it by email and nowhere else.
Attribute Mappings
Entra’s default attribute mappings work as shipped. Two attributes carry the meaning that AQT acts on: the user’s email address, which is how AQT identifies them, and active, which controls whether they have access. Given and family names are used if they are sent, and everything else is accepted and ignored.
Step 7: Assign Users and Groups (Azure)
Sign-in access and provisioning scope live on two different objects, so both need to be set.
Provisioning scope is on the enterprise application from step 4. Set Scope to Sync only assigned users and groups, then add the groups you want provisioned under Users and groups. Assigned groups must be security groups, as a Microsoft 365 group is not provisioned.
Sign-in access is on the enterprise application that step 2 created alongside the app registration. Its Assignment required setting is off by default, which means anyone in your tenant can sign in and no assignment is needed there. If you turn it on, assign the same groups, otherwise users will be provisioned without being able to sign in.
Note: On the free tier, groups cannot be assigned to an enterprise application. Set Scope to Sync all users and groups instead, which needs no assignment. This pushes the whole directory, and anyone outside your verified domain is declined and logged.
Then start provisioning. The cycle runs roughly every 40 minutes, so use Provision on demand against a single user or group to see the result immediately, including the exact request that was sent and AQT’s reply.
Please note that nested groups are not provisioned. Only immediate members are sent.
Step 8: Map Groups to Licenses and Roles (Portal)
Go to Settings > SCIM Provisioning > Map your groups. The groups pushed in step 7 will appear as unmapped, along with their member counts:
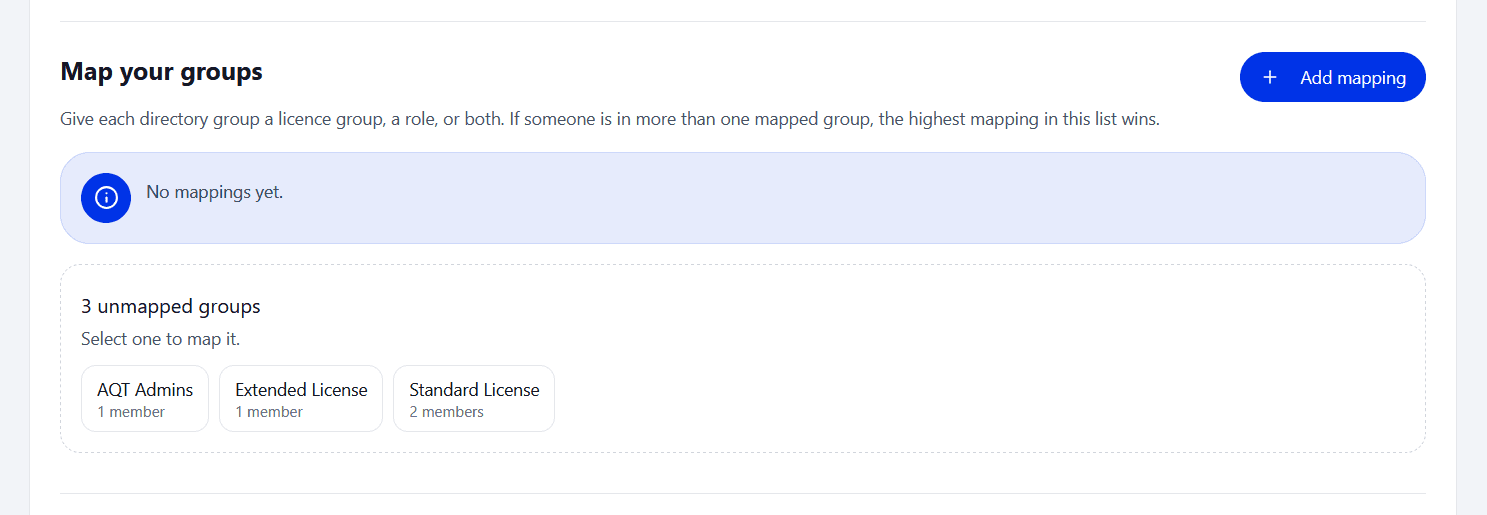
Select a group to open the mapping dialog, then choose:
Directory group: the group provisioned from Entra.
License group: the license its members should receive. This is optional.
Role: User or Administrator.
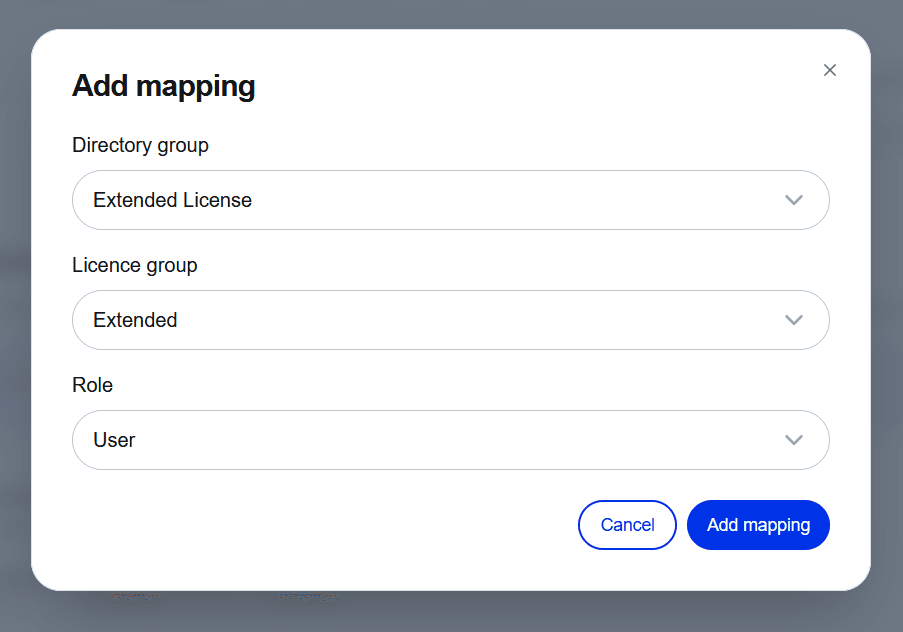
A mapping is applied on save to everyone already in the group, so no re-push is needed. Repeat this until every group you care about is mapped:
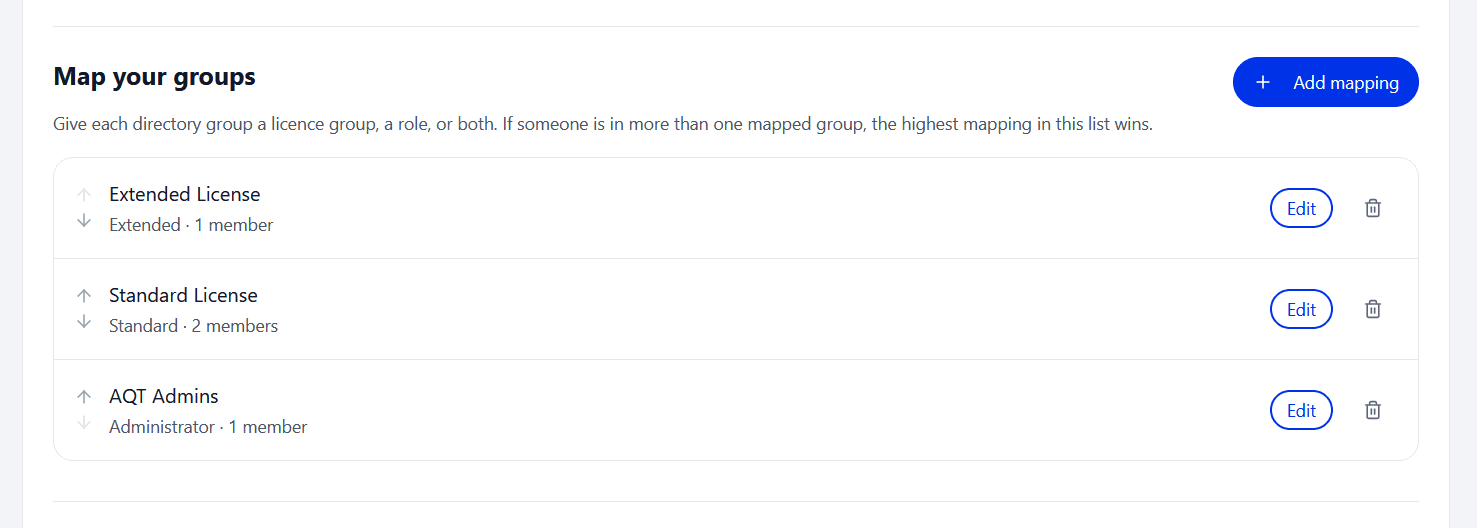
The list is ordered by precedence, and a few rules apply:
A user who is in more than one mapped group takes the license group of the highest mapping in the list. You can reorder the list with the arrows.
A new mapping is added at the bottom of the list, so move it up if it should outrank an existing one.
Each directory group gets a single mapping.
The license group is optional. To give administrators a role without consuming a seat, map their group to Administrator with no license group.
No group can grant Ownership, and the Owner role is not offered when creating a mapping.
A group matched by name, rather than by a provisioned group, can only grant the User role, because display names are not unique and a name match is not a reliable enough identity to grant administrator rights.
Renaming a group in Entra is safe, as AQT tracks groups by identifier rather than by name.
Step 9: Verify
The Last synced panel under the SCIM section reports the current state of provisioning:
No requests received yet means Entra has not reached AQT. Check the Tenant URL and token, or the cycle may simply not have run yet.
N users are waiting for a license seat means provisioning is working and you are out of seats. These users can sign in but cannot activate AQT One. Once you free or buy a seat, they are assigned automatically.
Recently declined or ignored lists requests that arrived but changed nothing. Each entry is labelled: Unknown member means a pushed group names someone who has not been provisioned, usually because they are not in scope; Not attached means the address is on a domain you have not verified; and Role ignored means a role attribute arrived and was discarded.
N users couldn’t be given a license means a mapping points at a license group that no longer exists, and the mapping needs to be repaired.
A green tick with a timestamp means provisioning is healthy, and the timestamp shows when Entra last reached AQT.
In Azure, Provisioning > Provisioning logs records every request along with AQT’s response body, so any AQT error text appears there verbatim.
For details on what provisioning will and will not change, what happens when seats run out, and how deactivation and removal behave, please see How SCIM Provisioning Behaves in AQT.